

Purifier Troubleshooting: Fault Diagnosis and Fixes
Purifier fault diagnosis: oil at the water outlet, water in clean oil, a bowl that will not open, incomplete discharge and vibration, with causes and fixes.
1. The troubleshooting rule
A purifier fault is diagnosed in a fixed order. Work down it. Do not begin by dismantling the bowl, and do not continue running a machine that is showing a dangerous symptom.
Safety before diagnosis, condensed. Stop and isolate immediately on excessive vibration, contact or rubbing sound, a sudden current rise, uncontrolled water or oil discharge, smoke or a burning smell. Do not open the machine while the bowl turns, and confirm zero speed before any inspection. The full safety procedure is Chapter 7.
Symptom, cause, action
Every fault in this chapter is written in the same three-part form: the symptom you observe, the probable cause, and the action you take.
A symptom is evidence. A cause is a hypothesis. An action is a test that either confirms or removes that hypothesis.
| Symptom family | System to examine | Action type |
|---|---|---|
| Oil leaving by the wrong outlet | Water seal, gravity disc, temperature, feed rate, interface | Adjust one operating condition, then re-observe |
| Water in the clean oil | Interface, gravity disc, sealing water, bowl closure | Confirm the interface before touching anything |
| Discharge faults | Operating water, solenoid, pilot valve, timers, ports | Check the hydraulic supply before stripping the bowl |
| Drive faults | Motor, friction clutch, bearings, gearing, bowl balance | Stop and inspect |
| Control and detector faults | Panel, wiring, sensors, alarms | Confirm the actual machine response, not the lamp |
One change at a time
Change a single setting, observe the machine, and record the result.
If you change two settings together and the fault clears, you have learned nothing: you do not know which change fixed it, and you do not know whether the second change has introduced a new fault that will appear later.
This matters because the controls are not independent. Raising temperature lowers viscosity but also lowers oil density, which moves the interface outward. Reducing feed rate improves cleanliness but changes the outlet balance. A gravity-disc change cannot fix a fault whose real cause is a failed water seal or a drifted feed temperature.
Never change two settings together. The whole of this chapter rests on that single discipline.
2. Data to record before changing anything
A change is only provable if you recorded the condition before you made it. Log these readings first, at the purifier inlet and at the control panel, not from memory.
| Reading | Why it matters |
|---|---|
| Oil type and batch | A new batch changes density, viscosity and water load — the commonest single cause of a sudden change in behaviour |
| Feed temperature at the purifier inlet | Sets viscosity and oil density; a heater display is not the same as the temperature at the bowl |
| Feed rate | Sets residence time and therefore the limit-size particle |
| Oil density or specific gravity and its reference temperature | Fixes the interface condition; a value at 15°C is not a value at 50°C |
| Water content of the feed | Explains a heavy-liquid load the bowl cannot clear |
| Motor current | Mechanical and process load; a rising trend is an early warning |
| Bowl speed | Confirms the centrifugal field is available |
| Light-liquid outlet pressure | Sets the hydraulic balance and the leakage-monitor reference |
| Heavy-liquid outlet flow | Shows whether water is leaving by the correct path |
| Operating-water pressure | Drives every open, close and seal action |
| Air pressure | Operates the feed valve and the control valves |
| Discharge interval and discharge sound | Confirms whether the bowl actually opened |
| Vibration level | Trended at the same point, it reveals imbalance before an alarm |
| Alarm code and detector status | Distinguishes a real condition from a sensor fault |
| Valve positions and gravity-disc size | Records the machine's actual configuration |
| Recent maintenance or oil change | A fault appearing right after an overhaul points at the overhaul |
A fault that appears immediately after an overhaul is compared first with what was assembled or set during that overhaul: disc count and order, disc-stack compression, tally-mark alignment, gravity-disc size and seal fitting. Do not start by re-diagnosing the process.
3. Oil at the water outlet
Symptom
Oil appears at the heavy-liquid (water) outlet instead of leaving clean through the light-liquid outlet. Oil losses rise and the leakage monitor may alarm.
Root causes
- Broken water seal from insufficient sealing water. Without the water charge, oil escapes straight out of the heavy-liquid outlet.
- Oil temperature too high. Heating lowers oil density, so the interface moves outward towards the bowl wall.
- Gravity disc too large. A larger inside diameter holds the interface further out; taken too far, oil reaches the heavy-liquid path.
- Throughput too high. Excessive feed disturbs the interface and pushes the oil outward.
Other contributing causes: heavy-liquid outlet back pressure too high, sealing-water leakage, and reduced bowl speed, which weakens the field that holds the interface.
Immediate actions
- Switch the feed three-way valve to recirculation so contaminated oil does not reach the service tank.
- Add sealing water and confirm the seal re-establishes.
- If the seal will not establish, stop the purifier, check the feed temperature, and fit a smaller gravity disc.
Diagnosis sequence
- Confirm actual oil temperature at the purifier inlet.
- Confirm the feed rate.
- Confirm the oil density and its reference temperature.
- Verify the gravity-disc selection against the maker's chart.
- Check sealing-water quantity and timing, then the strainer and valve.
- Check heavy-liquid outlet pressure.
- Confirm bowl speed and motor current.
- Only then inspect the bowl seal and hydraulic closure.
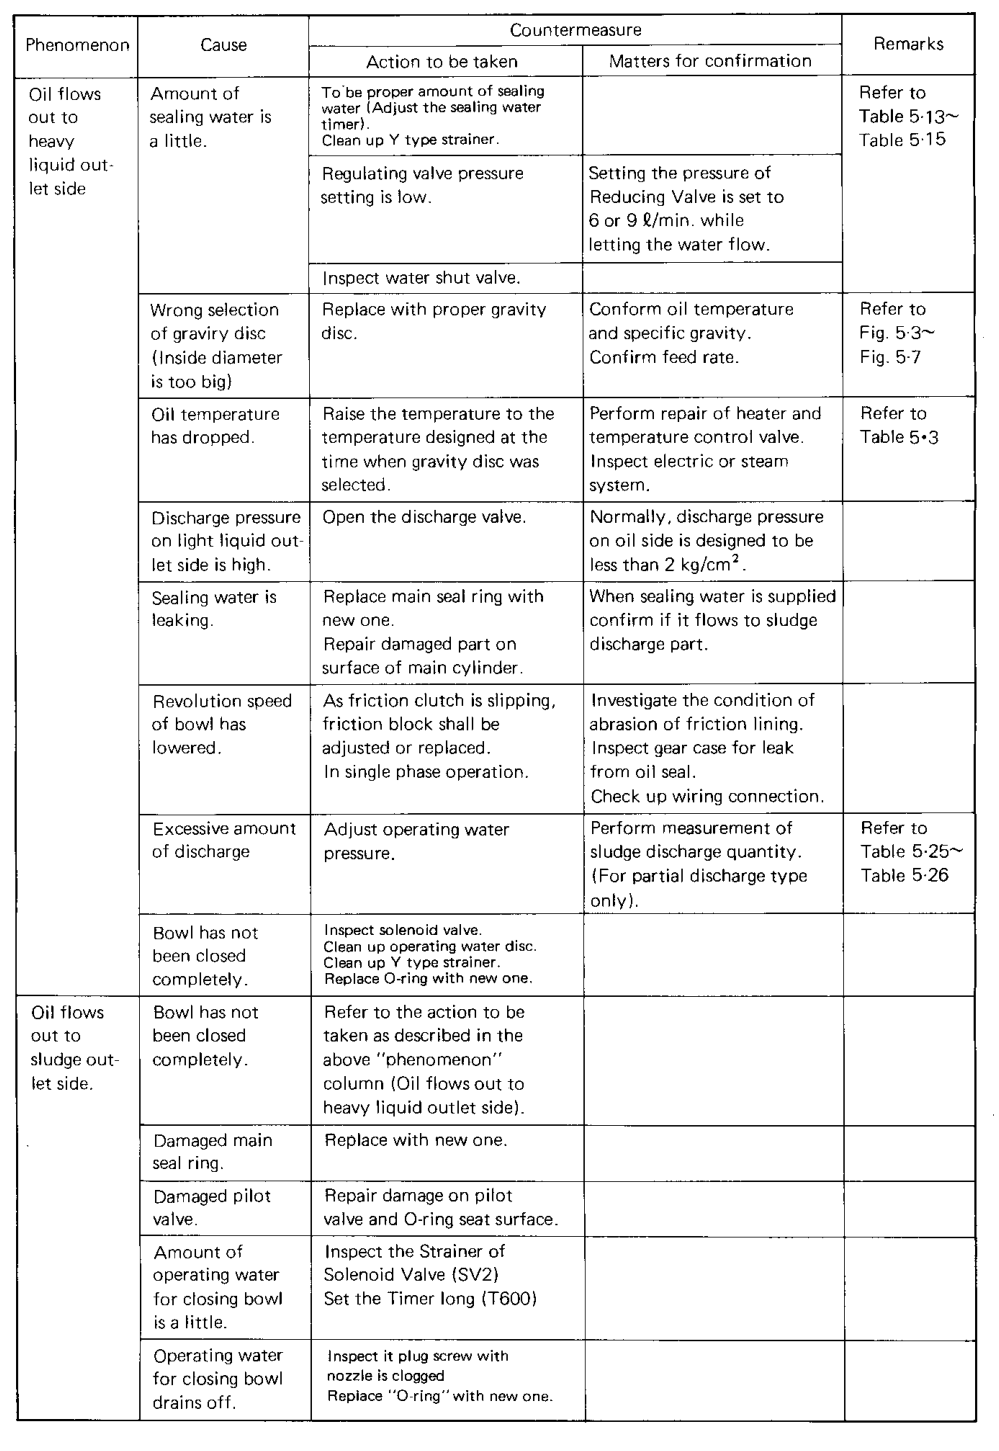
Work the sequence in order. A single check rarely identifies the fault on its own, and changing the gravity disc when the real cause is low speed, high pressure or a failed seal will not help.
4. Water in the clean oil
Symptom
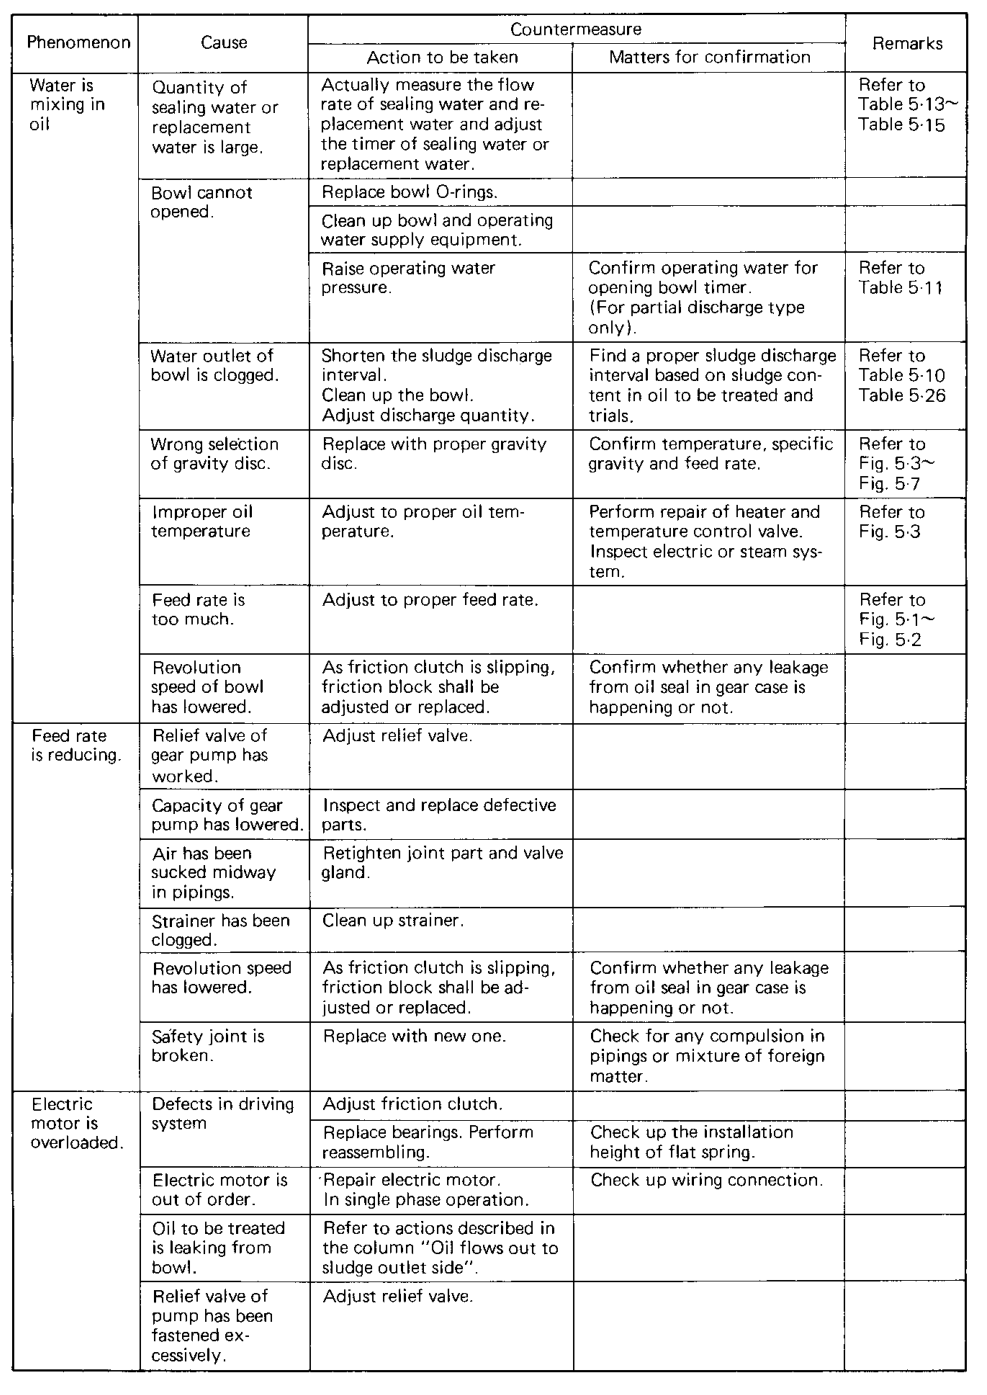
Water appears at the light-liquid outlet. The clean oil is cloudy, wet or emulsified, and the water detector may operate repeatedly.
Likely causes
- Gravity disc too small — the smaller inside diameter lets the interface move inward until the water region reaches into the disc stack and over the light-liquid outlet.
- Excessive sealing or replacement water — too much water in the bowl raises the water load and destabilises the interface.
- Feed rate too high — reduced residence time lets fine water droplets carry over.
- Feed temperature too low — high viscosity slows droplet migration.
- Bowl not fully closed or a damaged O-ring or main seal, allowing water to cross into the oil region.
- Heavy-liquid outlet restricted — water cannot leave and backs up towards the axis.
- Bowl speed low — the field is too weak to move the water outward.
Diagnosis sequence
- Stop or divert the contaminated oil.
- Confirm actual feed temperature and density.
- Confirm the feed rate.
- Check the selected gravity disc against the maker's chart.
- Measure sealing-water and replacement-water flow against the maker's figures.
- Check the heavy-liquid outlet for blockage.
- Check bowl closure, the top disc and the outlet assembly.
- Confirm bowl speed.
This is the mirror image of oil at the water outlet. A disc that is too large moves the interface outward and loses oil; a disc that is too small pulls the interface into the disc stack and puts water in the clean oil. Never pick a disc from memory — use the oil density at separating temperature and the maker's nomogram.
5. Broken water seal and oil overflow
The water seal is the charge of water that fills the heavy-liquid region before oil is admitted. It stops oil escaping through the water outlet and sets the starting position of the interface.
The seal is part of the separation principle, not just a starting step.
How the seal breaks
- Insufficient sealing water — low operating-water pressure, a sealing-water timer too short, a blocked strainer, or a solenoid that did not open.
- The seal is not re-established after a discharge because replacement-water timing is wrong.
- Feed is admitted too early, or at too high a rate, before the seal has settled.
- A damaged main seal ring, main-cylinder sealing surface, pilot valve or O-ring lets the sealing water drain away.
- Excessive discharge, or a bowl that is not fully closed.
How to recognise it
- Oil at the heavy-liquid outlet as soon as feed is admitted, especially at start-up.
- Leakage monitor alarm; light-liquid outlet pressure low or unstable.
- No discharge sound and no current change at the expected point.
- Oil overflow from the frame or the sludge chute.
How to restore it
- Switch feed to recirculation and stop feeding the machine.
- Confirm operating-water pressure at the maker's figure.
- Confirm the sealing-water timer and, where the manual requires it, measure the actual sealing-water flow.
- Re-run the seal and confirm it holds before feed returns.
- If the seal will not hold, stop the purifier, isolate and confirm zero speed, then inspect the main seal ring, main-cylinder sealing surface, pilot valve, O-rings and the operating-water strainer.
Do not chase a broken water seal with a gravity-disc change. The disc is either correct for the oil or it is not; a seal that will not establish is a hydraulic or seal fault and must be found.
6. Bowl will not open
Symptom
A discharge command occurs, but there is no discharge sound, no current change and no sludge movement. Sludge stays in the bowl and capacity falls.
Likely causes
- Operating-water pressure too low.
- Opening-water valve or solenoid not operating.
- Opening timer too short.
- Operating-water strainer clogged.
- Water passage blocked by scale or sludge.
- Bowl discharge port blocked.
- Main-cylinder seal damaged.
- Pilot valve not switching.
- Control wiring or solenoid fault.
- Sludge compacted around the sliding bowl bottom.
Diagnosis sequence
- Confirm the discharge command reached the control panel.
- Confirm the solenoid operates.
- Check operating-water pressure at the machine.
- Inspect the strainer.
- Check opening-water quantity and the timer setting.
- Confirm water reaches the correct chamber.
- After safe isolation, inspect the discharge ports.
- Inspect the main cylinder and pilot valve.
Do not repeatedly force a discharge cycle without finding why the bowl does not open. Repeated blind cycles pack the sludge harder and can press solids into the gasket.
7. Bowl closes too early
Symptoms
- Incomplete sludge discharge; sludge remains in the bowl.
- Discharge is small or weak.
- Vibration returns soon after the discharge.
- Repeated no-discharge alarms.
Causes
- Closing-water timer too long, or sequenced incorrectly against the opening-water period.
- Insufficient opening-water quantity, so the bowl never opens fully.
- Restricted operating-water passage.
- Solenoid valve leakage.
- Pilot-valve fault.
- Main-cylinder friction or seal damage.
- Control timer error.
Corrective checks
- Confirm the opening duration against the maker's timing table.
- Confirm the discharge quantity.
- Inspect the solenoid valves and strainers.
- Confirm operating-water pressure during the cycle, not just at rest.
- Confirm the bowl stays open long enough for the full discharge.
- Clean the bowl and the discharge ports.
A bowl that closes too early presses solids into the gasket. Left uncorrected, it produces premature gasket wear as well as incomplete discharge.
8. Incomplete sludge discharge
Likely causes
- Discharge interval too long.
- Discharge quantity too small.
- Bowl does not open fully.
- Opening-water quantity too small.
- Solenoid valve restricted.
- Water strainer clogged.
- Sludge ports blocked.
- Incorrect disc or bowl assembly, including low disc-stack pressure, too few discs or deformed discs.
- Sludge too dense or hardened.
Diagnosis
- Confirm, by safe inspection, that sludge really is remaining against the expected discharge quantity.
- Check the interval and the discharge quantity against the maker's table.
- Check opening-water pressure and timer.
- Check the solenoid and strainer.
- Clean the bowl and the discharge ports.
- Inspect the disc stack, compression and seals.
Consequences if left uncorrected
- Reduced bowl capacity and lost separating area.
- Faster imbalance and rising vibration.
- Reduced separation efficiency.
- More frequent alarms and increasingly difficult future discharge.
9. Sliding bowl bottom failure
The sliding bowl bottom is held closed by operating-water pressure in the closing chamber. It can fail in two opposite ways, and the two have different symptoms and different actions.
Fails to close, during start-up
- Low closing-water pressure. The closing chamber never develops enough force to seat the bowl bottom.
- Choked closing-water operating nozzle. Scale or sludge restricts the closing-water supply.
- Damaged lower bowl seal rings. The closing pressure leaks away past worn seals.
Other contributors: closing-water quantity too low, operating water draining away, and reduced bowl speed. The result is oil at the sludge outlet as soon as feed begins.
Opens unintentionally, during running
- Loss of closing water — supply pressure dropped, or the closing-water path leaks away.
- Clogged distributor valve — the hydraulic balance is disturbed and the bowl bottom is released.
- Heavy sludge accumulation tilting the bowl bottom — an unbalanced load lifts the moving part.
The result is sudden oil loss to the sludge outlet mid-run, usually with a current change and a discharge sound without a command.
Action
- Stop feed immediately if oil loss is significant, and stop the purifier if the bowl has opened uncontrolled.
- Confirm closing-water pressure, nozzle condition and strainer.
- After safe isolation, inspect the lower bowl seal rings, main cylinder and pilot valve.
- Shorten the discharge interval and confirm full discharge to remove the sludge load that tilts the bowl bottom.
- Renew the seals and clean the distributor valve before returning to service.
A bowl that opens unintentionally is a safety event, not a nuisance. Treat it as urgent and cross-reference the Safety chapter for isolation.
10. Excessive oil loss during discharge
Oil is lost to the sludge outlet every time the bowl opens, or the loss grows cycle by cycle.
Likely causes
- Total discharge used when partial discharge was the correct duty.
- Feed not stopped before the bowl opens.
- Discharge timing too long.
- Bowl not correctly closed before feed resumes.
- Incorrect water sequence after discharge.
- Excessive opening-water quantity.
- Wrong operating mode selected for the liquid being treated.
Corrective direction
- Confirm the purifier's correct discharge type for the duty.
- Confirm the feed-valve sequence stops feed before the bowl opens.
- Check the timers and solenoid operation against the maker's table.
- Confirm bowl closure and that the seal is restored before feed returns.
Do not reduce the discharge frequency to stop oil loss. If the discharge is incomplete, less frequent discharge makes the loss worse, not better.
11. Low feed, motor overload and low bowl speed
Low feed rate
Likely causes: feed strainer clogged; pump capacity reduced by wear; relief-valve setting incorrect; air entering the suction piping; a loose pipe joint or valve gland; foreign matter in the pump or pipe; reduced bowl speed; friction clutch slipping; motor problem.
Diagnosis: check the tank level and suction valve, then the strainer, then the suction for air leakage, then pressure and relief setting, then pipe joints and glands, then bowl speed and current, and only then the pump and drive.
Do not compensate for a restricted feed path by randomly changing purifier settings. Find the restriction.
Motor overload, high current
Likely causes: mechanical drag; bearing damage; the bowl rubbing stationary parts; excessive sludge imbalance; feed resistance or pump overload; friction-clutch fault; an electrical motor fault; incorrect assembly.
Immediate action: stop feed and observe vibration and sound; stop the purifier if the current rise persists or is dangerous; compare the reading with the maker's expected range; then inspect the mechanical and electrical causes.
Low bowl speed and failure to reach rated speed
Likely causes: friction clutch slipping; worn friction block; motor fault; low supply voltage; excessive mechanical drag; bearing failure; gear or shaft fault; overloaded pump; bowl assembly error.
Lower speed reduces the centrifugal acceleration, which falls with the square of speed:
ac = ω²r
Even a modest speed reduction strongly reduces separation performance, and can produce interface instability, poor water separation, oil to the heavy-liquid outlet, higher sludge carry-over and abnormal discharge behaviour.
- Do not introduce feed while rated speed is not achieved.
- Stop after the allowed starting period.
- Check current and sound.
- Inspect the friction clutch, friction block and drive.
- Check for mechanical resistance in the bowl, bearings and gearing.
12. Vibration and abnormal sound
This section diagnoses the cause. The emergency action — stop, isolate, keep personnel clear and do not open the bowl until zero speed — belongs to Chapter 7, Safety.
Vibration
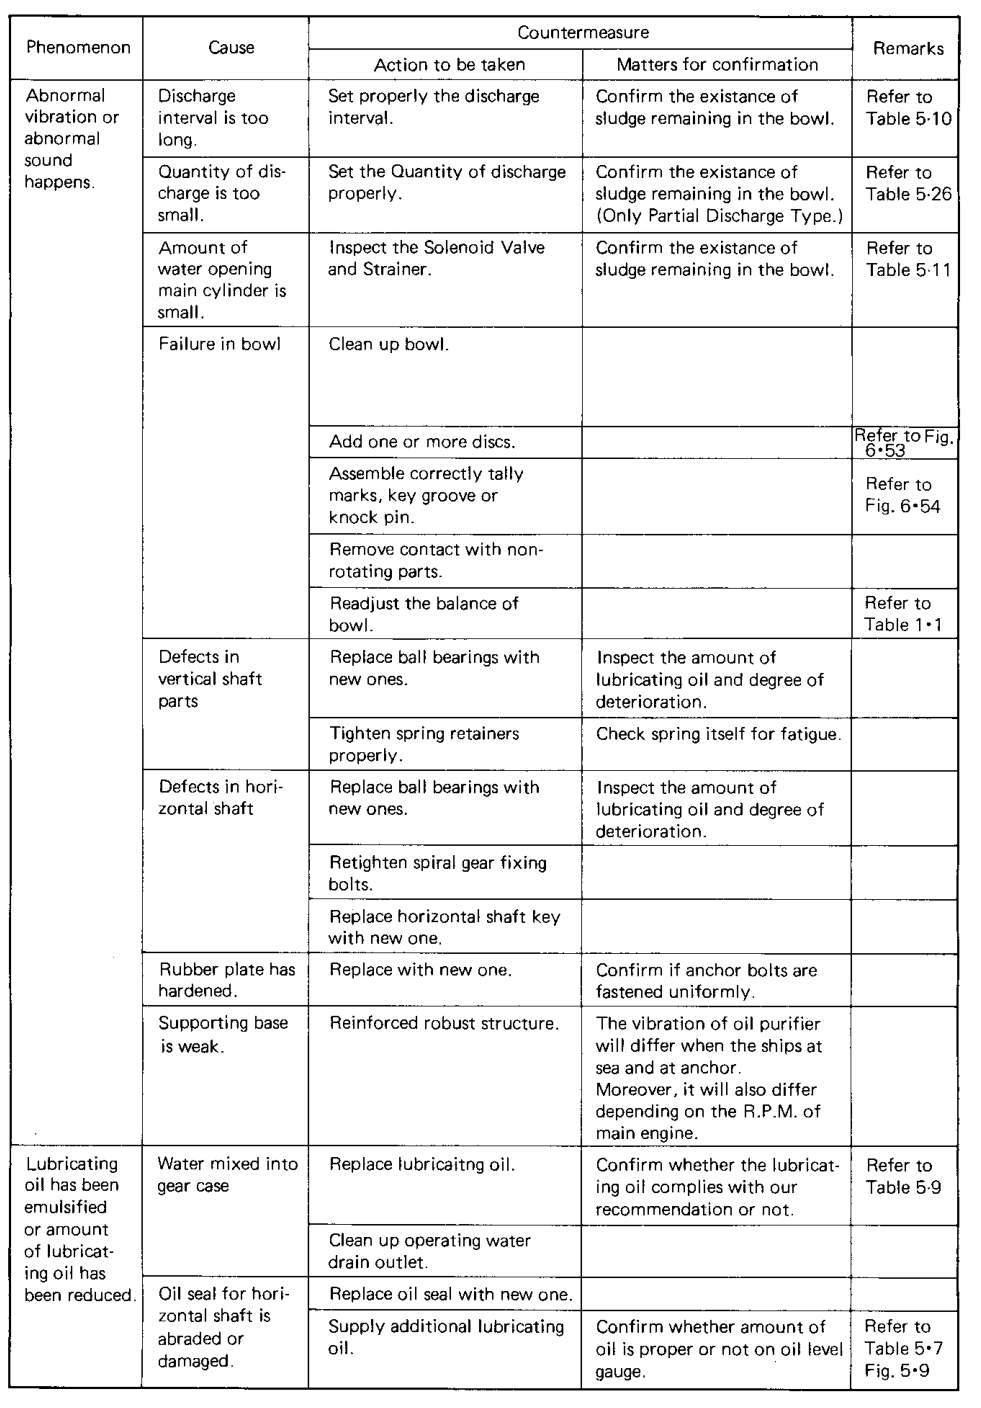
Some vibration is normal while the bowl passes through a critical speed during acceleration. Vibration that is large or persistent at rated speed is not normal and is a stop-now condition.
| Cause family | Typical causes |
|---|---|
| Bowl balance | Uneven sludge deposition; incorrect disc count; relaxed disc-stack compression; a missing disc or distance piece |
| Assembly | Bowl incorrectly assembled; parts from different bowls mixed; tally marks not aligned |
| Damage | Damaged bowl parts; a bent spindle; foreign material inside the bowl |
| Drive | Shaft or bearing defect; gear or horizontal-shaft fault |
| Installation | Weak foundation; loose anchor bolts; vibration transmitted from the ship or engine |
Abnormal sound
| Sound | Possible area |
|---|---|
| Rubbing or contact | Bowl, disc or a stationary part |
| Grinding | Bearing or gear |
| Knocking | Loose or damaged rotating part |
| Repeated hydraulic clicking | Solenoid or valve sequence |
| High-pitched slipping | Friction clutch |
| Sudden bearing noise | Bearing failure |
Abnormal sound is never ignored: high-speed contact can escalate to bowl failure very quickly.
Investigation after the machine has stopped
- Check whether the sludge deposit is uneven.
- Check the bowl assembly and the tally marks.
- Confirm the correct disc set, count and order.
- Inspect the bowl parts for damage and for foreign material.
- Inspect the bearings and the spindle.
- Check the supporting base and anchor bolts.
- Check whether the vibration depends on ship or engine speed.
Do not reduce the feed rate to quieten a vibration and continue running. That hides the symptom without correcting the cause. Stop and inspect — see Chapter 7 for the emergency procedure.
13. Detector and alarm faults
Leakage monitor — false leakage alarm
Likely causes: light-liquid outlet pressure too low; feed-rate fluctuation; temperature fluctuation; actual bowl leakage; pressure-sensor fault; incorrect delay setting; alarm output left enabled during adjustment.
Correct response: check the actual outlet pressure; check feed and temperature stability; confirm bowl closure and seal condition; check the sensor and wiring. Do not simply disable the alarm permanently.
Discharge detector — no-discharge alarm
Likely causes: the bowl did not open; discharge quantity too low to produce the expected speed change; discharge interval not yet reached; proximity sensor misaligned; sensor wiring fault; horizontal-shaft speed already unstable; sludge hardened in the ports.
Checks: confirm the discharge command; confirm opening-water pressure; observe current and sound; check the proximity sensor; inspect the actual sludge remaining after safe isolation.
Water detector — water alarm
Likely causes: actual water contamination; incorrect detector selector; wrong water sequence; excess sealing water; faulty sensor; dirty detector; operating-mode mismatch.
Fuel-oil and lubricating-oil modes use different regulating and washing processes, so confirm the panel is set for the correct liquid and mode.
Summary
| Alarm | Probable cause | First action |
|---|---|---|
| Leakage alarm | Low outlet pressure, feed or temperature fluctuation, or a real leak | Check actual pressure and stability before assuming the sensor |
| No-discharge alarm | Bowl did not open, quantity too low, sensor misaligned | Confirm command, opening-water pressure, current and sound |
| Water alarm | Real carry-over, wrong selector, excess sealing water | Check interface, disc, sealing water and mode |
A detector alarm can come from a real condition or from a sensor fault, and the two look identical on the panel. Confirm both. Never declare a discharge successful from a timer indication alone, and never treat a no-discharge alarm as an electrical nuisance.
14. Operating water, air and sealing water faults
Operating water insufficient
Symptoms: the bowl fails to open, closes incompletely, discharges weakly, or the leakage detector operates. The discharge sequence becomes irregular.
Causes: low supply pressure; regulating-valve setting low; source valve partly closed; strainer blocked; solenoid valve restricted; pipe leakage; air in the water line; operating-water tank problem.
Feed valve does not change
Causes: air pressure low; three-way cylinder valve fault; solenoid not energised; control-panel output fault; valve mechanically stuck; incorrect mode; interlock active.
Checks: confirm the command appears on the panel; check the air filter-regulator; check valve actuator movement; check the solenoid coil and wiring; confirm valve position; check whether an alarm or interlock is blocking operation. Do not force the feed valve while the controller is commanding an incompatible state.
Solenoid valve does not operate
Causes: no electrical output; coil failure; sticking valve spool; blocked pilot passage; low air or water pressure; strainer blockage; incorrect timer setting; loose connector.
Work in order: check the control output, then coil energisation, then valve movement, then water pressure and strainer, then the downstream passage. Separate electrical failure from hydraulic restriction before replacing parts.
Sealing water problems
- Too little — oil moves towards the heavy-liquid outlet and the interface may fail to establish.
- Too much — water contamination of the clean oil and an unstable interface.
- Leakage — caused by a main seal ring, main-cylinder surface, pilot valve, O-ring, valve seat or incorrect timing.
Diagnosis: measure the actual flow; check the timer; inspect the strainer; confirm pressure; inspect the bowl seal after isolation.
Air pressure low
Compressed air operates the feed valve, the control valves, the operating-water tank system and the leakage-detector system, so low air pressure can create false sequence behaviour.
Check the primary air pressure, the filter-regulator, air leaks, drain condition, valve actuator movement and any control-panel alarm.
Do not interpret a valve that fails to move as a mechanical bowl fault until air and control supply are confirmed.
15. Gear case and safety joint faults
Gear-case oil level low
Likely causes: oil-seal leak; drain leak; incorrect filling; shaft-seal damage.
Water in the gear case
Likely causes: operating-water leakage; condensation; damaged oil seal; blocked drain.
Corrective action for either: stop if contamination threatens the bearings; identify the source; drain the contaminated oil; replace the seal or repair the leak; refill with the specified lubricant only after the cause is corrected.
Safety joint breaks
A broken safety joint can indicate: excessive torque; bowl contact; drive seizure; a gear problem; bearing failure; foreign matter; severe sludge imbalance.
Do not simply replace the joint and restart. The joint broke because the torque became excessive; investigate why before running again.
Electrical motor fault
Symptoms: the motor does not start; the motor trips; the overload operates; current is unbalanced; the motor heats excessively; a starter alarm appears.
Checks: supply voltage; phase condition; wiring connections; overload setting; insulation; motor bearings; starter and contactor; control interlocks.
Separate an electrical motor fault from a mechanically overloaded purifier by comparing no-load and connected behaviour under the approved test procedure.
Control-panel sequence fault
Symptoms: the feed valve does not close; water valves operate in the wrong order; the discharge timer does not start; the bowl opens and closes incorrectly; an alarm appears without a mechanical symptom.
Checks: correct mode selected; AUTO/MANUAL switch; timer values; solenoid outputs; limit or detector signals; wiring connectors; air supply; sensor state.
Record the original values and change one controlled variable at a time.
16. Master fault table
One consolidated table for every fault in this chapter. The reference column names the chapter that covers the fault in depth.
| Symptom | Probable cause | Immediate action | Ref. |
|---|---|---|---|
| Oil at the water outlet | Broken water seal, temperature too high, gravity disc too large, throughput too high | Switch feed to recirculation; add sealing water; if the seal will not hold, stop, check temperature and fit a smaller disc | Ch 4 |
| Water in the clean oil | Gravity disc too small, excess sealing or replacement water, feed too high, bowl not fully closed | Reduce feed; verify the disc and sealing-water timing; check bowl closure | Ch 4 |
| Broken water seal or oil overflow at start | Insufficient sealing water, damaged main seal, pilot-valve leak | Re-establish the seal; if it fails, stop and inspect the seals | Ch 4 |
| Bowl will not open | Low operating-water pressure, blocked passage or strainer, opening timer too short | Check pressure, strainer, solenoid and timer; do not repeat the cycle blindly | Ch 5 |
| Bowl closes too early | Closing timer too long, short opening-water supply, sticking solenoid | Confirm opening duration and discharge quantity; clean the ports | Ch 5 |
| Incomplete sludge discharge | Interval too long, discharge quantity small, ports blocked, low disc-stack pressure | Shorten the interval, confirm opening water, clean the bowl and ports | Ch 5 |
| Sliding bowl bottom fails to close | Low closing-water pressure, choked closing-water nozzle, damaged lower bowl seal rings | Stop feed; check closing water and nozzle; renew the seal rings | Ch 5 |
| Bowl opens unintentionally | Loss of closing water, clogged distributor valve, heavy sludge tilting the bowl bottom | Stop and isolate; clean the distributor valve; discharge and rebalance | Ch 7 |
| Excess oil loss during discharge | Total discharge used for a partial duty, feed not stopped, timing too long | Confirm the discharge type and feed-valve sequence; correct the timers | Ch 5 |
| Low feed rate | Clogged strainer, worn pump, air in suction, relief valve | Clean the strainer, prime the suction, check the relief setting | Ch 5 |
| Motor overload or high current | Mechanical drag, bearing damage, sludge imbalance, bowl rubbing | Stop feed; observe vibration; stop if the rise persists | Ch 7 |
| Low bowl speed or will not reach rated speed | Slipping friction clutch, motor fault, bearing drag | Do not feed; stop after the allowed start period and inspect the clutch | Ch 6 |
| Excessive vibration | Uneven sludge, wrong disc count, relaxed disc-stack pressure, damaged parts, bearings | Stop immediately; isolate; inspect the bowl after zero speed | Ch 7 |
| Abnormal sound | Bearing or gear fault, rubbing, loose part, clutch slip | Stop immediately; do not open until zero speed | Ch 7 |
| False leakage alarm | Light-liquid pressure too low, feed or temperature fluctuation, sensor fault | Check actual outlet pressure and stability; do not disable the alarm | Ch 5 |
| Water alarm | Actual water carry-over, wrong detector selector, excess sealing water | Check interface, disc, sealing water and mode; find the cause before resetting | Ch 5 |
| No-discharge alarm | Bowl did not open, quantity too low, sensor misaligned | Confirm command, opening-water pressure and current or sound | Ch 5 |
| Feed valve does not change | Low air pressure, stuck valve, solenoid not energised, interlock | Check the air filter-regulator, actuator and coil; do not force the valve | Ch 5 |
| Solenoid valve does not operate | No output, coil failure, blocked pilot passage, low pressure | Separate electrical from hydraulic before replacing parts | Ch 5 |
| Operating water insufficient | Low supply pressure, blocked strainer, restricted solenoid, air in line | Restore pressure and flow; clean the strainer | Ch 5 |
| Air pressure low | Leaks, blocked filter-regulator, drain fault | Restore air; do not blame the bowl until supply is confirmed | Ch 5 |
| Sealing water wrong | Timer error, blocked strainer, leaking seal or pilot valve | Measure actual flow; correct timing; inspect the seals | Ch 4 |
| Gear-case oil low or water present | Seal or drain leak, operating-water leakage, condensation | Identify the source, drain, repair the seal, refill | Ch 6 |
| Safety joint breaks | Excessive torque, bowl contact, drive seizure, foreign matter | Do not just replace it; find why the torque rose | Ch 6 |
| Electrical motor fault | Supply, phase, overload setting, insulation, bearings | Compare no-load and connected behaviour; check the starter | Ch 6 |
| Control sequence fault | Wrong mode, timer error, solenoid output, sensor state | Record original values; change one timer at a time | Ch 5 |
| Purified-oil pressure high | Outlet valve closed, downstream restriction, back-pressure valve set high | Check downstream restriction before touching the gravity disc | Ch 5 |
| Oil temperature incorrect | Heater fault, control valve, sensor, supply | Repair the heater and control system; never offset with the gravity disc | Ch 6 |
| Frequent discharge required | High solids or catalyst fines, interval too long, bowl washing insufficient | Shorten the interval to manual guidance; check feed quality | Ch 5 |
| Poor separation with a correct disc | Dirty disc stack, low speed, high feed, disturbed interface, sludge interval too long | Work the order: condition, flow, interface, then the bowl | Ch 4 |
Where the same fault appears in more than one source, it is listed once here with the most useful action. If a fault resists the immediate action, move to the deeper diagnosis in the referenced chapter rather than repeating the same action.
17. What not to do
- Do not operate with excessive vibration or abnormal sound.
- Do not dismantle or open the machine before the bowl has reached zero speed.
- Do not change the gravity disc without checking the temperature and the oil density at separating temperature.
- Do not change two settings at once, and do not adjust several timers simultaneously.
- Do not increase the feed rate to compensate for a fault.
- Do not reset an overload or an alarm repeatedly without identifying the cause.
- Do not disable a detector alarm permanently to silence it.
- Do not replace a safety joint without finding why the torque became excessive.
- Do not extend the discharge interval when the bowl is already overloaded.
- Do not reduce the feed rate to hide a vibration instead of inspecting the bowl.
- Do not assume a detector alarm is false without checking the machine.
- Do not assume a discharge occurred because the timer ran.
- Do not weld cracked bowl or disc parts.
- Do not restart after abnormal sound without inspection.
Diagnose in order, record before you change, and change one thing at a time. Those three habits resolve more purifier faults than any spare part.
Found a mistake, or something unclear?
Report it in a few seconds — it goes straight to the editors.
- Purifier Principle: Centrifugal Separation & Stokes' Law
- Purifier Types: Purifier vs Clarifier, Disc vs Tubular
- Purifier Construction: Bowl, Disc Stack and Drive
- Purifier Working: Three-Phase Flow & Gravity Disc
- Purifier Operations: Start-Up, Running & Conditioning
- Purifier Maintenance: Cleaning, Inspection & Overhaul
- Purifier Safety: Emergency Stop, Fire-Fighting & Vibration Response
- Purifier Troubleshooting: Fault Diagnosis and Fixes