

Sea Chest Strainers: Construction, Standby-First Changeover & Safe Cleaning
Learn sea chest strainer construction, differential pressure limits, standby-first changeover protocol, flooding safety, and basket cleaning.
1. Sea Chest Strainer Construction & Filtration Architecture
Before seawater reaches central cooling pumps, auxiliary generators, or freshwater generators, it passes through heavy sea chest suction strainers located in the lower engine room bilges. These strainers represent the ship's primary mechanical defense against debris entering sensitive machinery cooling circuits:
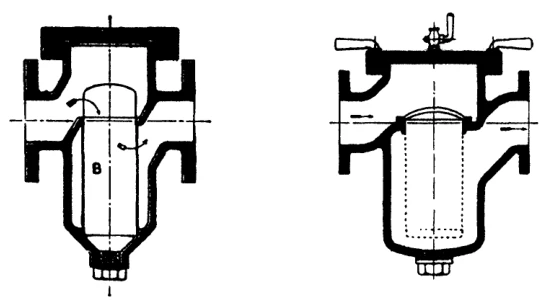
Key Construction Components:
| Component | Material Specification | Engineering Function |
|---|---|---|
| Strainer Body & Cover | Nodular cast iron (GGG40), cast steel, or bronze; internally coated with epoxy or vulcanized rubber lining. | Forms the pressure-containing chamber; connects directly to the ship-side suction line and pump suction cross-over header. |
| Perforated Basket Element | Cupro-Nickel (Cu-Ni 90/10), Monel 400, or 316L Stainless Steel with 5 mm to 8 mm perforations. | Traps floating debris, weeds, and shells inside the basket. Seawater enters into the basket interior and discharges outward through the perforations. |
| Air Release Vent Cock | Marine brass or bronze 1/2" plug or ball cock terminating above a drain tundish. | Crucial for purging air trapped in the upper cover during flooding before the strainer is brought on-line. |
| Bottom Drain Valve / Plug | Bronze ball valve or threaded brass drain plug. | Empties the housing water to the bilge before opening; acts as a safety telltale to detect passing isolation valves. |
| Sacrificial Zinc Anodes | High-purity zinc blocks bolted inside the lower housing corners. | Provides cathodic protection to the ferrous strainer body against severe galvanic corrosion in aerated seawater. |
| Differential Pressure (ΔP) Gauge | Dual-diaphragm gauge connected across strainer inlet and outlet ports. | Provides continuous visual indication of internal debris accumulation and basket cleanliness. |
Inside-to-Outside Flow Geometry
Marine basket strainers are engineered so seawater flows from the inside of the basket outward into the discharge chamber. Consequently, all trapped shells, weeds, and plastic waste remain contained inside the basket. When the basket is lifted out for cleaning, no debris falls back into the downstream piping or pump suction.
2. Differential Pressure (ΔP) Monitoring & Operational Hazards
Continuous monitoring of the differential pressure (ΔP) across sea chest strainers is a vital watchkeeping routine. As marine growth and floating garbage accumulate across the basket mesh, hydraulic resistance increases dramatically:
| ΔP Reading | Filter Status | Impact on Central Cooling System | Operational Action Required |
|---|---|---|---|
| ≤ 0.10 bar (1.5 psi) | Clean / New Basket | Full design flow rate; minimal suction head loss to cooling seawater pumps. | Normal running; record gauge reading in engine logbook every watch. |
| 0.15 to 0.25 bar | Moderate Debris | Slight increase in suction depression; pump motor running current stable. | Plan sea chest changeover and strainer basket cleaning at the next convenient opportunity. |
| 0.35 to 0.40 bar | High ΔP Warning | Cooling pumps suffer severe suction starvation; cavitation initiates with rattling noises in pump casings. | Urgent changeover required! Prepare standby sea chest immediately using the Standby-First protocol. |
| > 0.50 bar (7.2 psi) | Critical Choking | Seawater pumps de-prime completely; delivery pressure collapses; main engine jacket and scavenging air high-temperature alarms trigger. | Emergency response: slow down main engine, bring standby cooling pump on-line, and execute emergency changeover. |
Common Shipboard Marine Debris Hazards:
- Jellyfish Swarms: In tropical estuaries and shallow coastal anchorages, jellyfish can blanket strainer baskets in minutes. Their gelatinous bodies smash into the mesh under suction pressure, forming an impermeable rubbery skin that causes instant cooling pressure collapse.
- Drifting Seaweed & Kelp: Encountered in stormy coastal passages. Long kelp strands wrap tightly around basket ribs, creating massive flow restrictions.
- Frazil Ice in Sub-Zero Waters: In polar navigation, microscopic ice crystals form in seawater at −1.8°C. These crystals adhere to cold metal mesh surfaces and rapidly freeze solid into slush, completely choking the strainer unless low-pressure steam injection or warm seawater recirculation is activated.
- Plastic Refuse & Polypropylene Bags: Discarded plastic sheets and bags sucked into the chest adhere flat against the basket face, blanking off large filtration areas instantaneously.
3. The Standby-First Changeover Protocol
Changing over sea chest strainers is an exacting operation. An incorrect sequence will draw an air pocket into the cooling main, de-priming the centrifugal cooling pumps and causing an immediate loss of main engine cooling or generator blackout.
Danger: The Golden Rule: Standby-First
Never throttle, isolate, or close the duty sea chest strainer until the standby strainer has been completely flooded, thoroughly vented of air, and proven under full line pressure!
-
Pre-Changeover Coordination & Sounding Check:
Inform the Officer of the Watch (OOW) on the bridge and the Second Engineer. Verify the ship's draft and depth under keel (echo sounder). Confirm that the standby filter basket is clean, boxed up, and its ΔP gauge reads zero.
-
Open Vent Cock & Flood Standby Strainer:
Open the air release vent cock on top of the standby strainer cover. Slowly crack open the ship-side suction valve (1 to 2 handwheel turns). High-pressure air will hiss violently from the vent cock as incoming seawater floods the housing.
-
Purge Air Completely (Solid Water Discharge):
Keep the vent cock open until all air spitting ceases and a solid, continuous, bubble-free stream of seawater discharges into the funnel. Close the vent cock tightly.
-
Commission Incoming Standby Strainer (Parallel Operation):
Fully open the ship-side suction valve to its back-seated position. Next, open the strainer outlet isolation valve fully. Both sea chest strainers are now running in parallel, sharing cooling water flow.
-
Verify Seawater System Stability:
Observe the central seawater cooling pump discharge pressure gauge (typically 2.0 to 2.5 bar) and motor running current. Verify that pressure remains completely rock-steady without any fluctuation or needle hunting.
-
Isolate the Fouled Duty Strainer:
Slowly wind shut the suction valve of the fouled strainer while continuously keeping watch on the SW pump pressure gauge. Next, close the fouled strainer's discharge valve. The incoming unit is now in full solitary service.
4. Safe Isolation, Venting & Cover Unbolting Protocol
Opening a sea chest strainer represents one of the most hazardous maintenance tasks in a ship's engine room. Because the strainer is located well below the external waterline, failure to isolate the ship-side valve can flood the engine room within minutes with thousands of tonnes of seawater under immense hydrostatic head.
Danger: Extreme Hazard: The Passing Ship-Side Valve
Never rely on valve position indicators or handwheel tightness alone! If a piece of wood, crab shell, or wire rope is trapped in the ship-side valve seat, the valve may feel tight while remaining partially open. Always prove zero water ingress via the bottom drain before releasing cover nuts!
Mandatory Safety Protocol for Opening Strainer Covers:
- Apply Lockout / Tagout (LOTO): Wire-lock and tag the isolated ship-side suction valve and discharge valve: "DANGER: DO NOT OPERATE — MEN WORKING ON STRAINER".
- Open Top Vent Cock: Relieve any trapped residual hydraulic pressure in the upper housing.
- Open the Bottom Drain Valve: Allow internal water to drain completely into the bilge.
- The Telltale Test: The drain stream must taper off and cease completely within 1 to 2 minutes.
- ABORT CRITERIA: If water continues gushing from the drain pipe under constant pressure, an isolating valve is passing! Immediately close the drain and vent, abandon disassembly, and investigate valve seating!
- The Safety Stud Technique (CRITICAL):
- Slack off all perimeter cover nuts by 1 to 2 turns only.
- Keep at least two diagonally opposite safety nuts engaged on their studs by 3 full threads.
- Use the integral jacking screws or a soft brass wedge to break the cover gasket joint.
- Listen and watch: if pressurized seawater suddenly sprays from the joint face, tighten the nuts down immediately! The safety studs prevent the cover from blowing off under water pressure.
- Only when the gasket joint is completely broken with zero water leakage may the remaining nuts be unscrewed and removed.
5. Basket Cleaning, Anode Renewal & Box-Up Protocol
Once the heavy cast iron cover is safely detached, proceed with the systematic inspection and servicing of the strainer basket:
-
Rigging & Basket Extraction:
Attach an overhead engine room chain block to the strainer cover lifting eye. Lift the cover clear and swing it onto wooden dunnage on the engine room floorplates. Engage the lifting tackle onto the basket bail handle and hoist the heavy basket vertically out of the housing.
-
Debris Removal & Pressure-Washing:
Carry the basket to the engine room washing flat. Empty all trapped mud, shells, and seaweed into waste bins for shore disposal (never dump alien biofouling species overboard in port!). Thoroughly pressure-wash the basket inside and out with high-pressure fresh water. Use a stiff brass wire brush to clear stubborn barnacles from perforation holes.
-
Structural Basket Inspection:
Inspect the basket cylindrical seams, bottom weld, and top landing collar for fatigue cracking, erosion thinning, or mechanical deformation. Ensure the basket rim sits perfectly true and flat on its internal housing support ring to prevent debris bypass.
-
Sacrificial Zinc Anode Servicing:
Scrape clean the zinc anode blocks mounted in the strainer bottom. Measure remaining thickness: if the anode is more than 50% consumed, unbolt and renew it immediately. Ensure bright metal-to-metal electrical contact between the new zinc anode stud and the cast housing.
-
New Gasket Fitting & Diagonal Torquing:
Scrape and clean the cover and body gasket mating surfaces. Cut and punch a new 3 mm reinforced neoprene or synthetic rubber gasket. Apply a thin coating of silicone grease or tallow (never use adhesive silicone sealant that glues the cover down!). Lower the cover squarely onto the studs and torque all nuts in a criss-cross diagonal pattern in three incremental stages.
-
De-Aeration & Standby Readiness:
Shut the bottom drain valve tightly. Open the top vent cock. Crack open the ship-side suction valve to purge all air until solid water emerges, then shut the vent cock. Leave both suction and discharge valves shut. The serviced strainer is now pressurized, leak-tested, and sitting in pristine ready standby.
Found a mistake, or something unclear?
Report it in a few seconds — it goes straight to the editors.
- Ship Pipelines — Seawater, Bilge, Ballast & Fuel Systems
- Globe, Gate & Non-Return (SDNR) Valves: Working, Troubleshooting & Overhaul
- Butterfly Valves: Working, Construction, Troubleshooting & Overhaul
- Sea Chests (High/Low Suction) & Marine Growth Prevention (MGPS)
- Sea Chest Strainers: Construction, Standby-First Changeover & Safe Cleaning
- Pipe Corrosion, Water Hammer & Failure Response
- Steam Traps, Pressure Reducing Valves (PRVs) & Condensate Drainage