
Scavenge Space & Crankcase Inspection — Reading the Engine from Inside
Air flows one way and information flows back: what deposits on a piston say about combustion, and the checklist that catches a dying bearing early.
Key Principles at a Glance 6 points
- Scavenge ports work both ways: air flows in, and a view of piston, rings and liner flows back — reporting on lubrication and combustion without opening the engine.
- Each surface mark points at a distinct cause: sticky rings, micro-seizure, scuffing, wear ridges and clover-leaf corrosion are diagnoses, not just defects.
- Crankcase inspection hunts squeezed-out metal, slack fasteners, stepped punch marks, blue hot-spot patches and wiped bearings — every finding has a why.
- Oil flow is compared unit-to-unit because uniformity is health and deviation is the alarm; relief doors are spring-tested, not just looked at.
- Close-up discipline decides safety: tools counted out, doors shut unbolted, LO flow proven with the pump running, then bolted and torqued uniformly.
- Entry itself follows enclosed-space SMS procedure with the engine immobilised — the checklist starts before anyone climbs in.
1. Scavenge Ports Are a Window into Combustion
Idea first: air flows one way — manifold, under-piston space, liner ports, cylinder — and information flows straight back along the same path. The ports let you look at the piston crown land, the rings and the liner wall without lifting a head.
Two things are graded at every look: the amount and nature of deposits on the piston top land and rings, and ring behaviour — rings must be undamaged and free in their grooves, never sticky, loose or sluggish.
Running-parameter trends sit behind the glass: power balance, exhaust temperatures and scavenge pressures caught early keep small deviations from becoming piston damage.
2. Read the Marks, Not Just Their Presence
Idea first: every mark on piston, rings or liner is a signature of one specific failure of film, load, water or chemistry — the pattern names the cause, so the fix lands on the cause instead of the symptom.
| What you see | What it means | Where to look next |
|---|---|---|
| Sticky or sluggish rings | Deposits jamming the groove — ring can no longer follow the wall | Lube rate and timing, fuel quality, groove cleanliness |
| Micro-seizure | Film broke down: lubrication failure or overload welding ring to wall | Load balance, oil supply, scavenge water washing the film off |
| Scuffing, scratches, wear ridges | Hard contact — debris or dry running scoring the surfaces | Filtration, abrasive ingress, running-in discipline |
| Clover-leaf corrosion | Acid attack between lubrication points | Fuel sulphur vs BN match, lube distribution |
3. Crankcase Map — Know What Lives Down There
Idea first: the crankcase is a dark box full of the engine's most loaded parts — crankshaft, connecting rods, crosshead bearings, guides, and tie rods in some designs — so inspection follows a map, not memory.
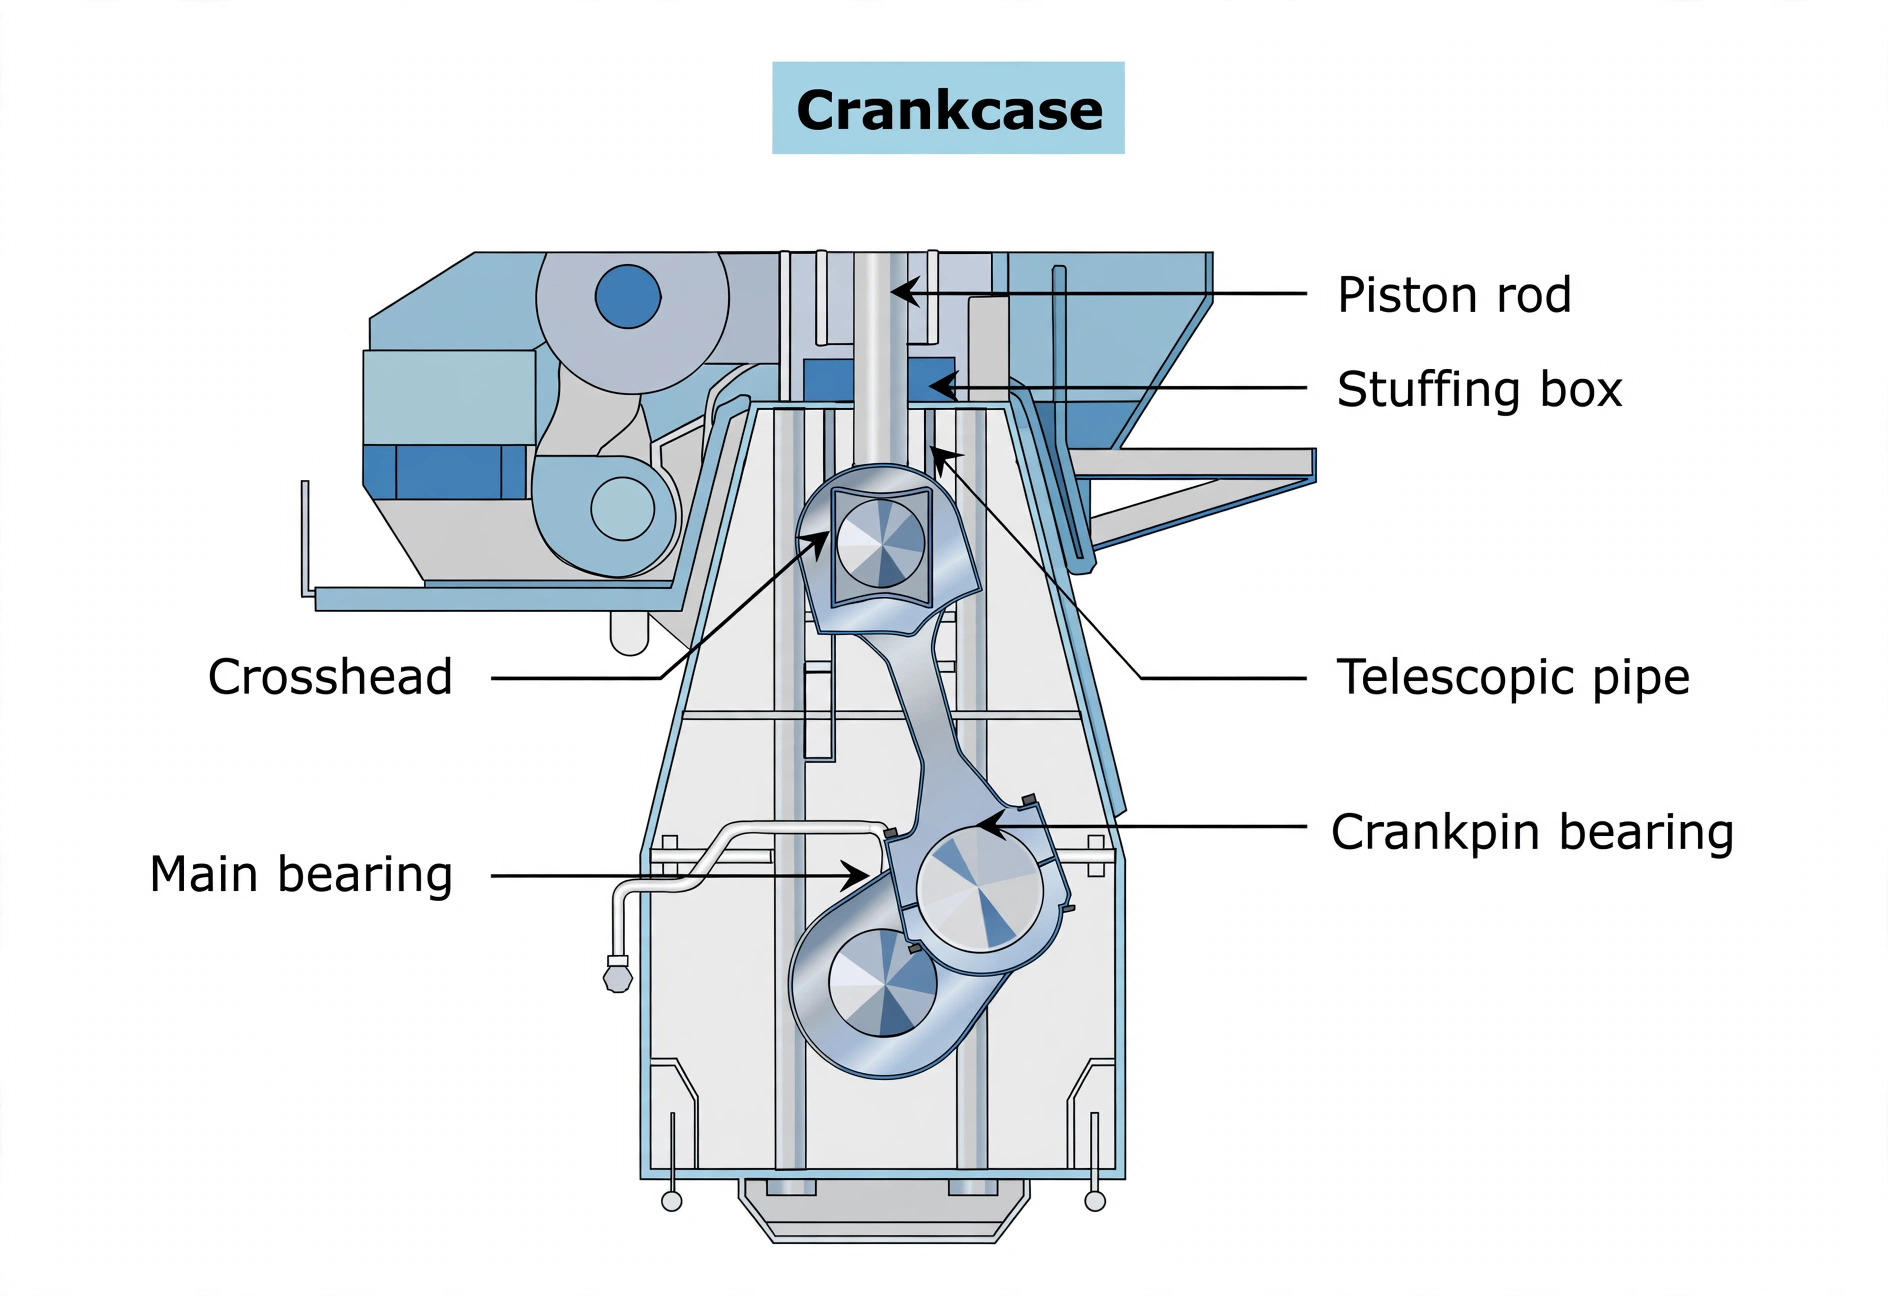
Crankcase entry is enclosed-space work: SMS procedure, ventilation, permit, engine immobilised. Preparation and precautions follow the shipboard SMS — the checklist below covers the inspection itself, for a two-stroke crankcase.
4. The Running-Gear Checklist
Idea first: a failing bearing announces itself long before it wrecks the engine — as smell, colour, shifted marks or squeezed metal — so the inspector works nose-first, then structure, then fasteners, then flow.
Smell and sweep: nose first, then structure:
- Unusual odour means oil contamination — investigate before running on.
- Dry-sump gratings clear of deposits, peeled paint, metal and damage — so return oil flows freely and debris is spotted.
- Bedplate welds sound and tie-rod bottoms tight — so the structure holds alignment under firing load.
Slip marks: punch marks across web and journal must sit in one line — a stepped line means the journal has slipped in the web.
Hot spots: dark blue patches flag overheating in progress — investigate before it becomes a seizure or an explosion.
Running gear: every joint tight, every surface clean:
- Crosshead and guides undamaged — so the rod runs true without scoring.
- Connecting-rod bolts, locking wires and plates secure, piston palm nuts locked — so firing loads cannot slacken the drive train.
- Bearings visually free of wipe-off — so white metal stays bonded and carries load.
- Side cheeks of shells, guide shoes and strips checked for squeezed-out or loosened metal — so early distress is caught at the edges first.
- Stuffing box dry with its locks intact — so crankcase oil stays out of the scavenge space.
- LO pipe flange bolts tight against vibration — so oil reaches the bearings instead of spraying the crankcase.
Flow, doors and drives: uniformity is health, deviation is the alarm:
- LO flow through every main, rod and crosshead bearing and guide shoe compared with neighbours — similarity is health; clearances measured periodically to maker figures.
- Relief-door springs, sealing rings and wire mesh sound, door seals intact, correct opening pressure proven with a spring balance — so an explosion vents safely.
- Transmission gears and chain drives correctly tensioned on the maximum free length — so camshaft timing stays exact.
Fragments of bearing metal in the oil pan mean a bearing is already failing — no further running arguments, open up and find it.
5. Prove Flow, Then Bolt the Doors
Idea first: the inspection is only proven good when oil is seen running where it should and nowhere else — so the doors close last, and only after a running pump has given its evidence.
Coming out, double-check no tools are left behind — and confirm crankcase door sealing rings are fit to seal.
Close every door but leave them unbolted — so flow can still be watched with access open.
Start the LO pump and check flow in all units with zero crankcase leakage — so every bearing proves it is fed before it must carry load.
Bolt all doors and tighten uniformly — so sealing is even and no door becomes the weak one.