
Plate Heat Exchangers — Cleaning, Tightening & Gaskets
Thin corrugated plates force turbulent flow so heat crosses fast and deposits get swept away — but the pack is a measured assembly where one uneven pull on the tie-bolts wrecks plates for good.
Key Principles at a Glance 6 points
- Corrugations force turbulent flow that thins the thermal boundary layer — more heat per unit area and less fouling than tubes, though fine debris still settles, mostly on the seawater side.
- The pack length (frame-plate to pressure-plate distance) is the single most important number: return to exactly it, never below the smaller of two quoted figures.
- Backflush first by reversing one or both flows, assess the improvement, and only open the unit if performance stays down.
- Slacken and tighten tie-bolts evenly in the manual sequence with a torque spanner; over-tightening and uneven tightening permanently destroy plates.
- Restart cold-fluid first for 20 minutes before hot fluid — hot shock on a cold pack warps plates and blows joints.
- Gasketed plate exchangers are capped at 20 bar and 200 °C — above that, or for lube-oil duty with large differentials, shell and tube wins.
1. How a Plate Pack Is Built
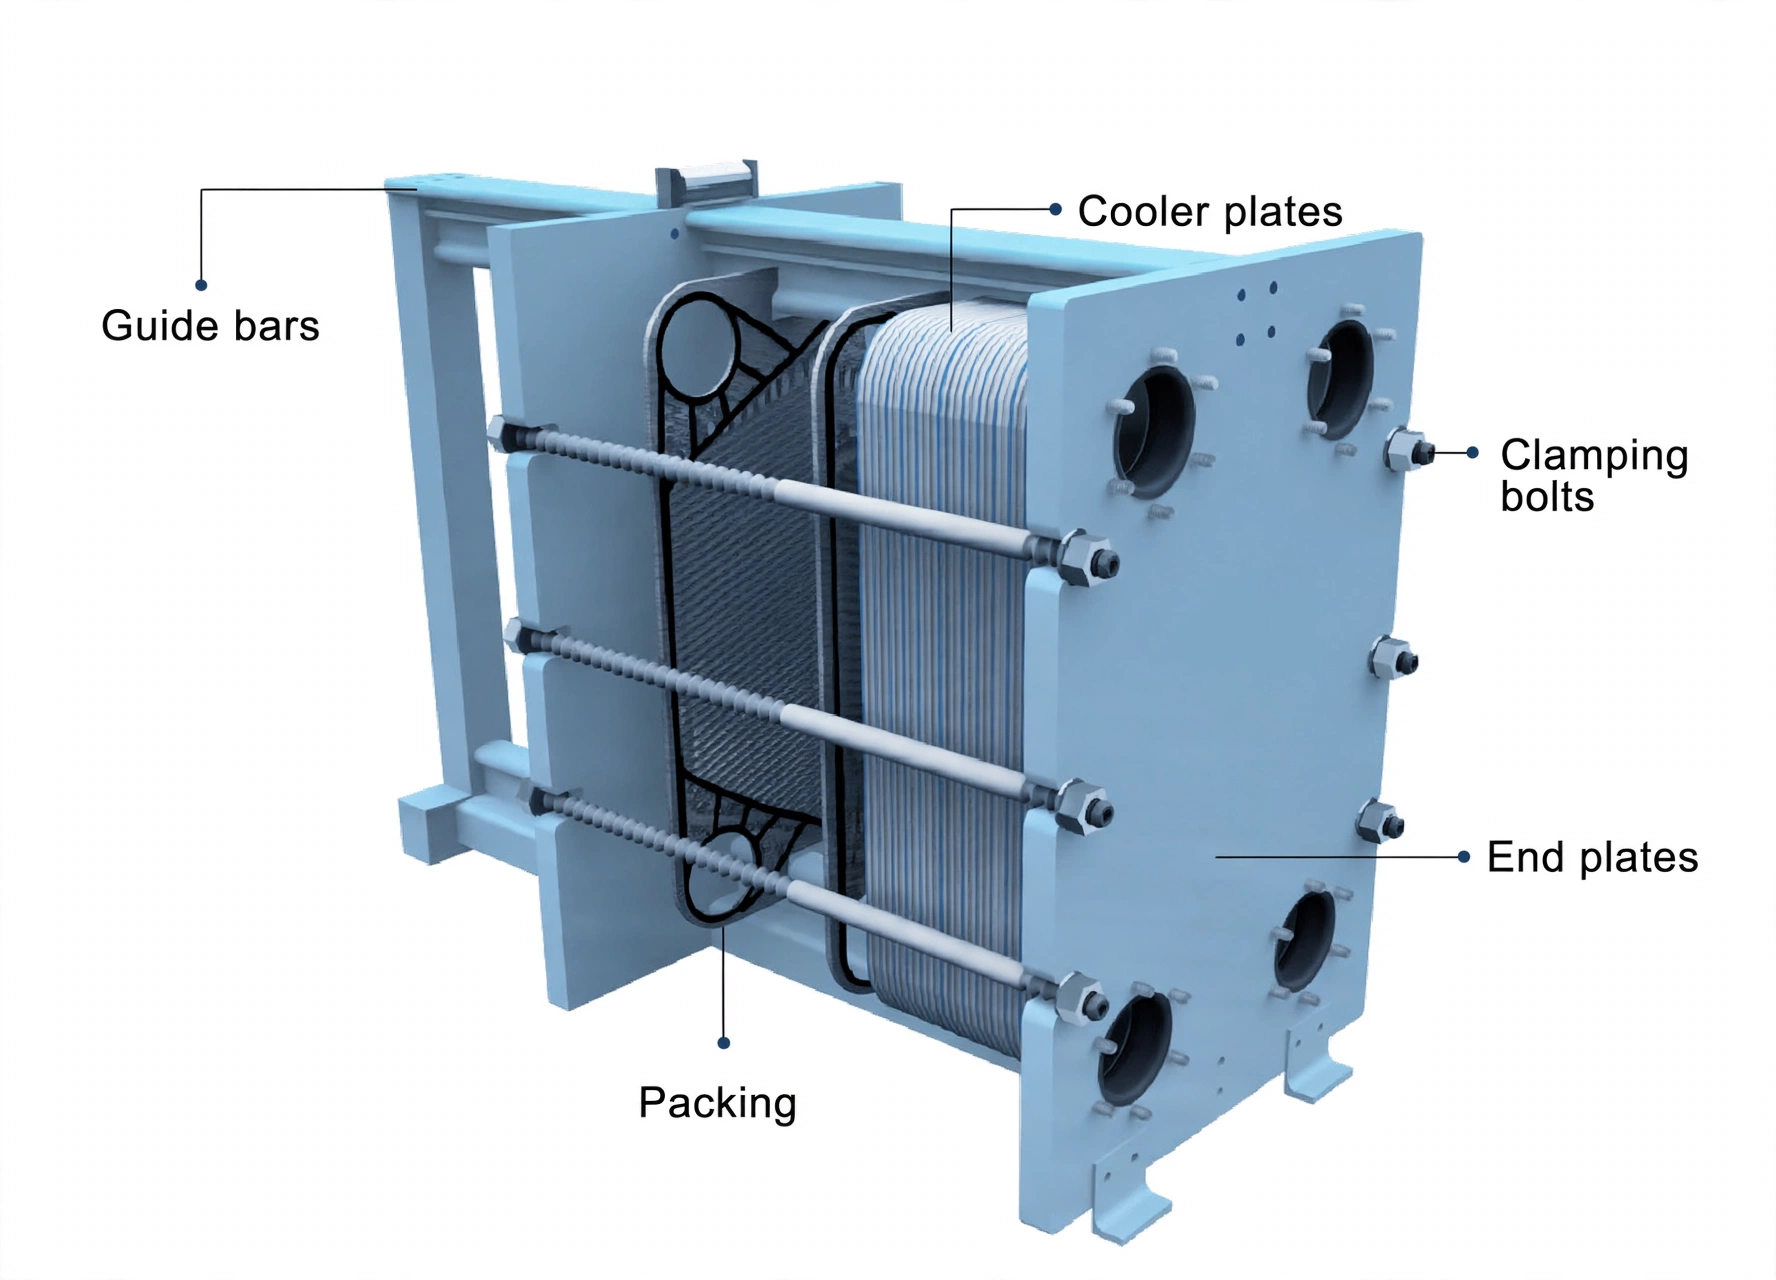
Heat crosses a millimetre of metal instead of a tube wall — corrugated plates hang on a top guide bar between a fixed frame plate and a sliding pressure plate, clamped by tie-bolts, with cold fluid on one side of each plate and hot on the other. Corrugations force turbulent flow, which thins the thermal boundary layer so more heat crosses per unit area, and the same scrubbing flow sweeps deposits away — the plate cooler's whole edge over tubes.
Each plate carries a gasket that both seals and channels flow, and the gasket design prevents the two liquids mixing. Pack length is controlled gasket squeeze: enough compression to seal every channel, never enough to crush plates or kill the gaskets.
The plate pack length — frame-plate to pressure-plate distance — is stamped on the drawing and type plate. Some units quote two lengths: the larger is for new gaskets; as gaskets age you may tighten further, but never below the smaller figure, or plates deform permanently.
2. Routines & Backflush Before You Open
Fouling charges four penalties at once — lower thermal efficiency, higher pressure drop, extra maintenance, and lost production while the plant is down. Because corrugations keep plates cleaner but never fully clean, the defence is a calendar rhythm plus a no-dismantling flush that clears the inlet before anyone touches a bolt.
| When | What |
|---|---|
| Daily | Check temperature differential across the plate stack, cold-fluid side and hot-fluid side. |
| 3 months / as demanded | Backflush (reversal of one or both flows for short periods); assess improvement; circulation-clean cold-fluid and hot-fluid sides with maker-recommended chemicals; assess improvement again. |
| 6 months / as demanded | Inspect sealing packing material (renew if damaged or brittle); mechanically clean plates; assess improvement after cleaning. |
| Yearly minimum | Check temperature and flow against commissioning data; general condition and leakage check; wipe painted parts and touch up damage; check bolts and bars for rust, clean, lightly coat threads with molybdenum grease or corrosion inhibitor (keep grease off gaskets); oil follower-plate rollers with light machine oil; grease roller-holder and tightening-nut ball bearings. |
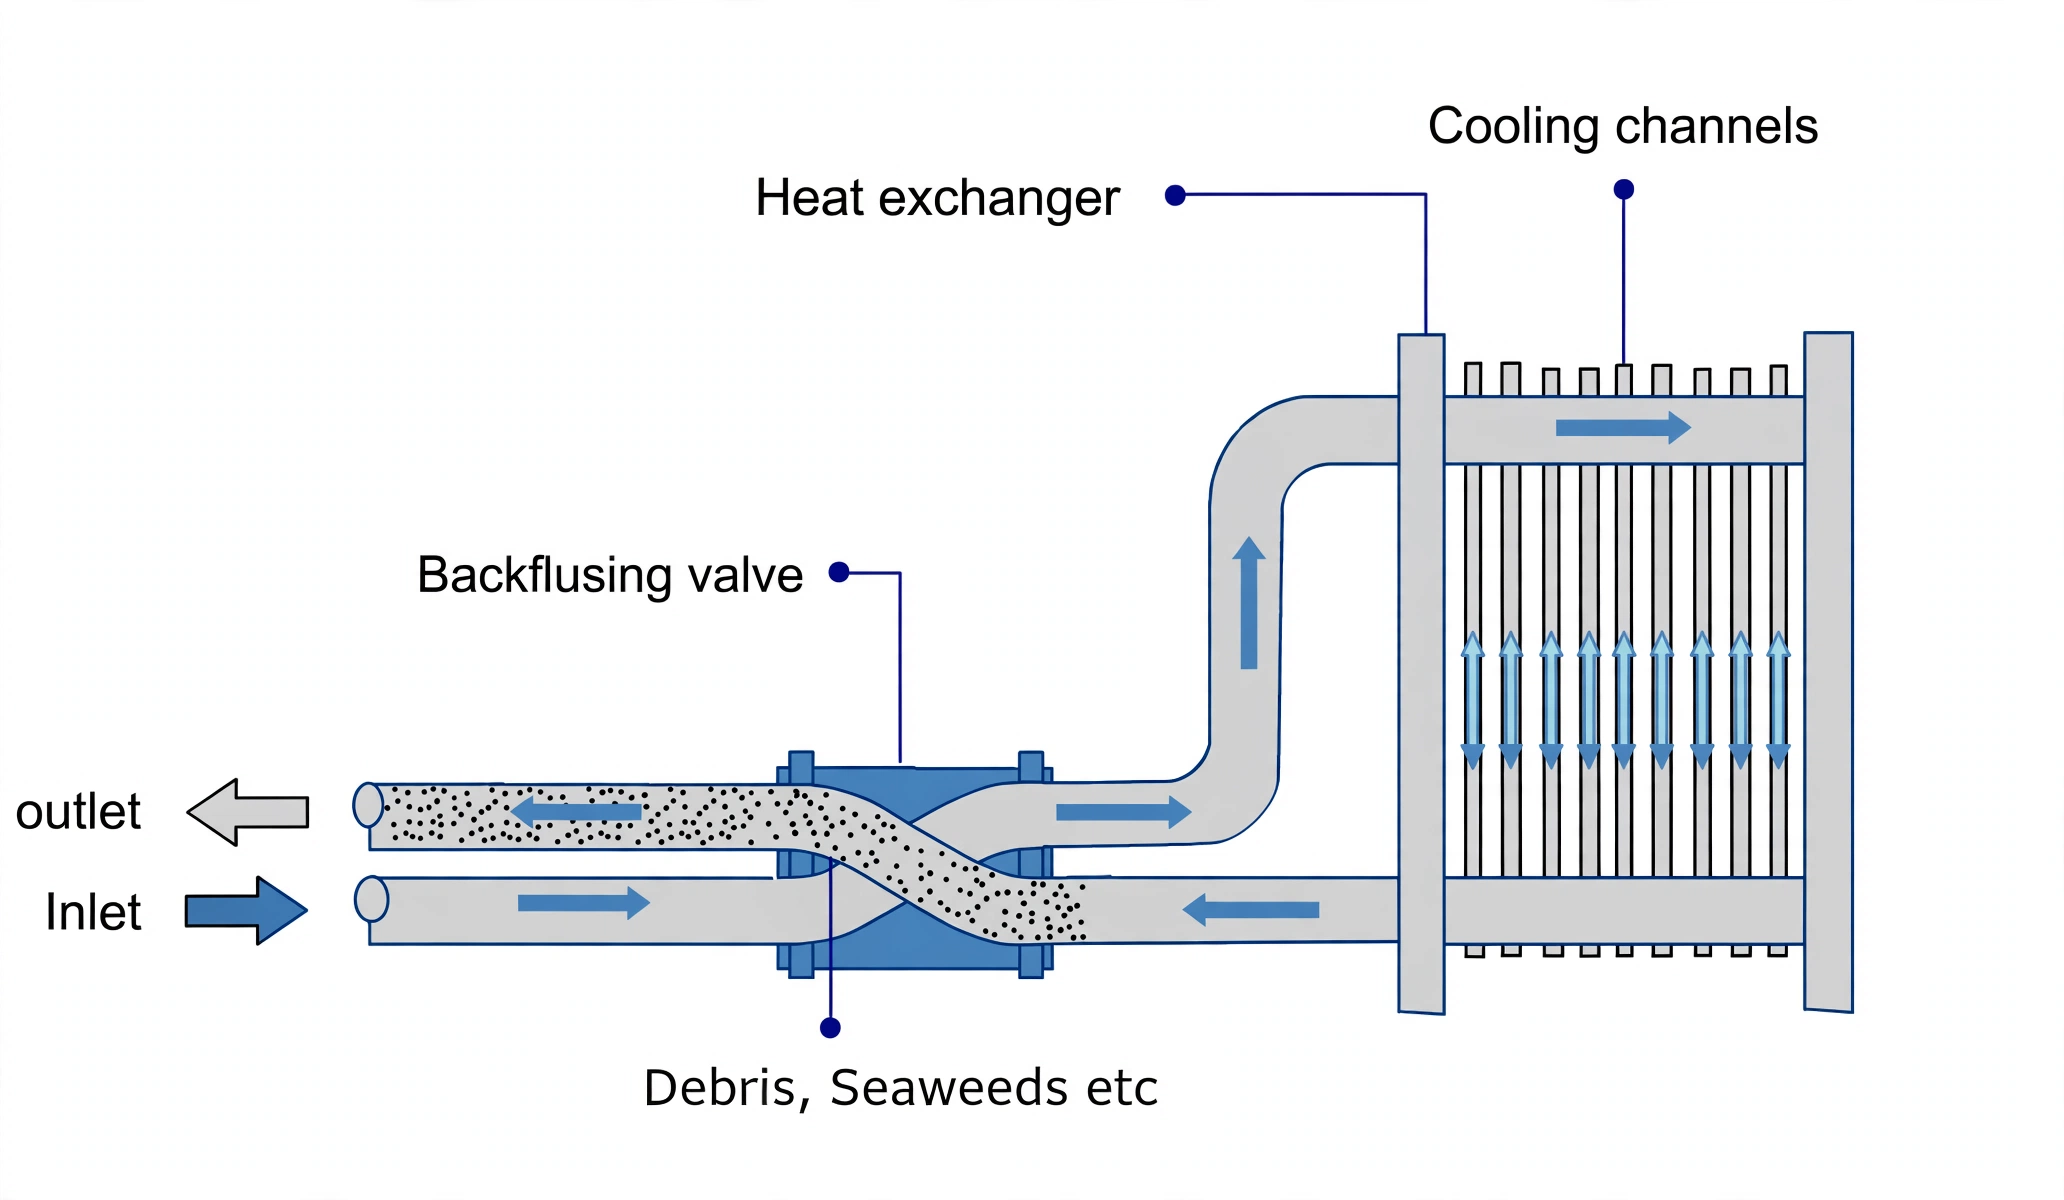
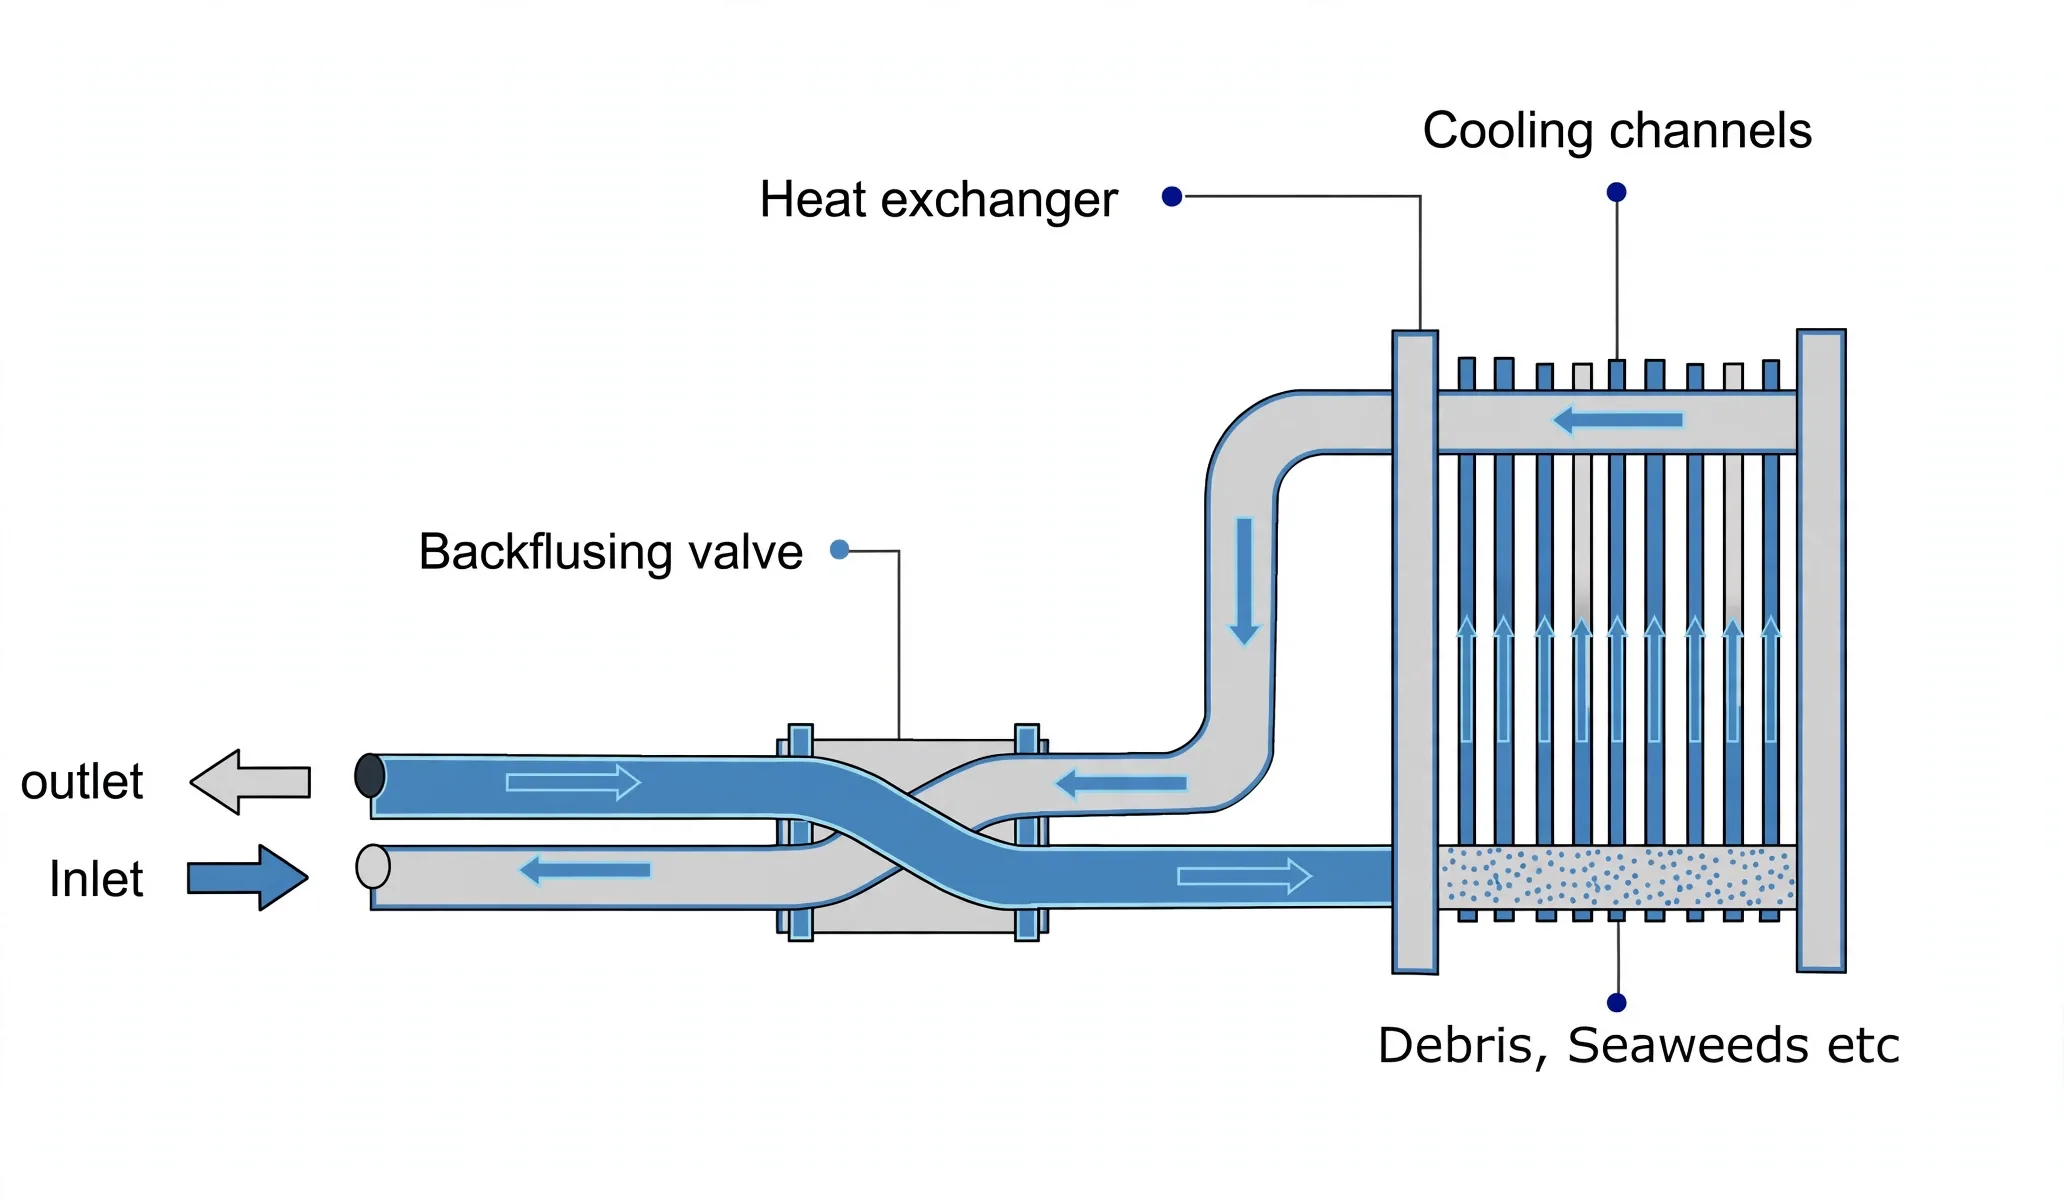
Backflushing works because the dirt sits in the inlet region and the exchanging channels — reversing flow flushes it out the same way it entered. Deposits concentrate on the seawater side. Always backflush first and assess; only open up if performance stays down.
3. Open and Clean — Measured, Even, Gentle
A plate seals by flat, even gasket squeeze — any warp in the metal breaks that plane forever. So every move in this sequence protects flatness: measure before, slacken evenly, clean gently, tighten in sequence, restart without thermal shock.
- 1Isolate, then measure. Close the correct valves; record the frame-plate to pressure-plate distance — this number is your reassembly target. Use the special spanner provided.
- 2Slacken evenly — unequal slackening warps plates permanently, and a warped plate never seals again at any torque. Slide the pressure plate back on the guide bar; plates can be cleaned in place on their bars.
- 3Hose and soft-brush each plate with freshwater, scrubbing gently with the soft brush provided. Protect the rubber packings — seawater-side deposits run heaviest, but scouring the gaskets is forbidden.
- 4Reassemble on the bar, then tighten with a torque spanner in the manual's sequence to the prescribed torque, measuring the distance on all four sides as you go so clamping stays even. Confirm the pre-dismantling distance. Chemical cleaning by circulating maker-recommended solution is the alternative for plates that need it.
- 5Return to service cold-first: open cold-fluid valves, circulate 20 minutes, then open hot fluid. Hot fluid into a cold pack means sudden thermal expansion against cold gaskets — the shock that warps plates and blows joints. Check every joint for leakage.
Keep the carrying bar and tie-bolts clean and lubricated (never painted), oil the pressure-plate rollers, grease the roller-holder bearings. Over-tightening and uneven tightening are the two classic ways crews destroy a healthy pack — follow the maker's procedure exactly.
4. Gaskets & Faulty Plates
A nitrile gasket seals by springing back — sustained heat above normal drives plasticisers out, the rubber hardens, loses elasticity, and the squeezed joint takes a permanent set instead of rebounding. That is why aged packs need retightening toward the smaller length, why that minimum is absolute, and why renewal is a chemistry job, not a scraping job.
Gasket renewal
- 1Pull the old gasket from its groove; warm the groove back with a hot-air blower if needed — never acetylene gas.
- 2Clear charred cement and rubber with a rotating stainless-steel brush, then wipe the groove with a solvent-dampened cloth (acetone or equivalent). Dry the gasket the same way.
- 3Seat correctly: stretch short gaskets into the groove; fit long ones at the plate ends first, working toward the middle.
- 4Bond with the correct adhesive and follow the maker's instructions exactly: two-component cold-curing epoxy for high-temperature joints (needs heat to remove later), one-component rubber-based cement where temperature allows (removable without heat).
Manual seal ripping wrecks plates. Freezing with liquid nitrogen embrittles nitrile so it contracts and breaks away cleanly. Suitable adhesive bonds nitrile seals; joints squeezed during assembly must never be over-tightened.
Faulty plate drill
- A cracked or holed plate cannot be located without opening — dismantle and inspect every plate for deformation, cracks, holes and gasket condition.
- Swap in a spare with identical holes and gasket layout.
- No spare for a leaking 4-port plate? Remove it plus the adjoining 4-port plate, retighten to the correspondingly shorter pack length. Capacity drops only slightly.
5. Shell vs Plate — Pick the Right Cooler
Neither design wins everywhere — the choice is which constraint bites harder: pressure and leak-findability favour tubes, while size, efficiency and capacity growth favour plates. Titanium plates are highly corrosion-resistant, and stainless steel and aluminium-brass versions have cut the cost of what was once the expensive option.
| Shell & tube | Plate | |
|---|---|---|
| Size / weight | Bulky; needs tube-nest withdrawal space at one end | Smaller and lighter; no extra overhaul space |
| Efficiency | Lower heat transfer | Higher — turbulent flow also resists fouling; no limit to flow velocity; plates available in different trough geometries |
| Capacity growth | Fixed once built; made in any size, large or small | Add plates in pairs to increase duty |
| Leak location | Easy — pressure-test, find, plug the tube | Hard — cracks hide; dismantle to find |
| Pressure / temperature | Handles high temperature and pressure with lower drop across the tube sheet; preferred for lube-oil cooling; can double as receiver in refrigeration | Gasketed packs capped at 20 bar / 200 °C; joints embrittle and may fail; titanium plates costly (stainless and aluminium-brass now common) |
| Upkeep | Less complicated design, crew-friendly; anodes protect the whole circuit; less expensive | Simpler cleaning, but tightening and gasket discipline is unforgiving — over-tightening permanently damages plates |